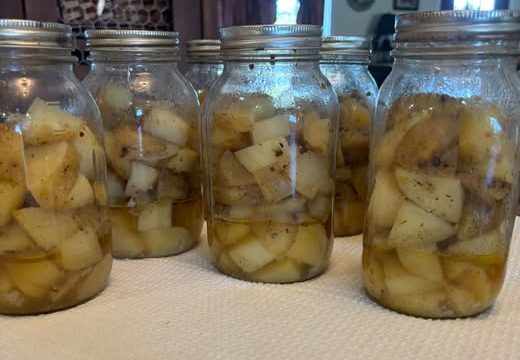
A shelf full of home-canned potatoes is one of those pantry sights that makes dinner feel much easier before you have even decided what to cook.
Open a jar and you already have tender potatoes ready for soups, breakfast skillets, casseroles, stews, mashed potatoes, or a quick side dish.
Potatoes are a low-acid vegetable, so jars intended for room-temperature pantry storage must be processed in a pressure canner. The good news is that the basic tested recipe is surprisingly simple: potatoes, fresh boiling water, and optional salt.
Why Can Potatoes?
Canning potatoes is especially useful when you have a large harvest or find a good deal on a bag of potatoes.
Instead of worrying about them sprouting before you can use them, you can preserve part of the supply for future meals.
Once canned, the potatoes are already tender.
That means they can go straight into:
- Soups
- Stews
- Breakfast hash
- Potato salad
- Casseroles
- Chowders
- Shepherd’s pie
- Mashed potatoes
- Fried potato skillets
They are especially convenient on busy evenings when peeling and boiling another pot of potatoes is the last thing you want to do.
Choose the Right Potatoes
Start with fresh, mature potatoes that are firm and in good condition.
Avoid potatoes that are:
- Soft
- Moldy
- Heavily sprouted
- Green
- Badly bruised
- Beginning to rot
Small to medium potatoes work particularly well.
If you want to can potatoes whole, tested home-canning guidance recommends small potatoes about 1–2 inches in diameter. Larger potatoes should be cut into approximately ½-inch cubes. (CncaD)
Waxy or all-purpose potatoes tend to hold their shape nicely, although ordinary white potatoes work well.
Peel the Potatoes
For shelf-stable pressure-canned potatoes, peel them first.
The tested procedure is based on peeled potatoes rather than potatoes canned with the skins attached. (CncaD)
Wash the potatoes thoroughly.
Peel them.
Rinse again.
Cut away eyes, sprouts, bruises, or damaged areas.
If cutting into cubes, try to make the pieces fairly uniform so they heat evenly.
Prevent the Potatoes From Darkening
Freshly peeled potatoes can turn gray or brown while sitting.
To keep their color brighter, place them in an ascorbic-acid solution while you finish preparing the batch.
You can use a commercial produce color protector according to the package directions.
Another easy option is to work in smaller batches so the peeled potatoes do not sit exposed to air for very long.
Drain them before the next step.
Ingredients
For a basic batch you need:
- Fresh white potatoes
- Fresh water
- Canning salt, optional
That is it.
Salt is included for flavor rather than preservation.
If you want to use it, add approximately:
- ½ teaspoon per pint jar
- 1 teaspoon per quart jar
You can also leave the salt out completely.
Season the potatoes after opening instead.
Equipment
You will need:
- A proper pressure canner
- Canning jars
- New canning lids
- Screw bands
- Jar lifter
- Funnel
- Bubble-removing tool
- Large saucepan
- Clean towels
Do not use a boiling-water canner for potatoes.
Low-acid vegetables require pressure canning to reach the processing conditions needed for safe shelf storage. (CncaD)
Par-Cook the Potatoes
Bring a large pot of water to a boil.
For cubed potatoes, place the cubes into boiling water and cook for 2 minutes.
Drain them.
For small whole potatoes, boil them for approximately 10 minutes, then drain. (CncaD)
The potatoes are not supposed to become completely soft at this stage.
They will continue cooking during pressure processing.
Use Fresh Boiling Water
This little detail matters.
After par-cooking the potatoes, do not use the starchy cooking water to fill the jars.
Instead, bring a separate pot of fresh water to a boil.
The potato cooking water contains a lot of starch and can become unnecessarily cloudy and thick. The tested method specifically calls for fresh boiling water in the jars. (CncaD)
Fill the Jars
Place the hot prepared potatoes into clean jars.
Do not mash or tightly compress them.
Add the optional salt.
Pour fresh boiling water over the potatoes.
Leave 1 inch of headspace at the top.
The potatoes should be covered with the boiling water while still maintaining the required headspace. (CncaD)
Run a bubble-removing tool around the inside of the jar.
Check the headspace again.
Add a little more boiling water if necessary.
Wipe the jar rim carefully.
Apply the lid and screw band according to the lid manufacturer’s instructions.
Pressure-Canning Times
For tested hot-packed white potatoes:
Pint jars: 35 minutes
Quart jars: 40 minutes (CncaD)
The pressure you use depends on your canner type and altitude.
Dial-Gauge Pressure Canner
For pints or quarts:
- 0–2,000 feet: 11 PSI
- 2,001–4,000 feet: 12 PSI
- 4,001–6,000 feet: 13 PSI
- 6,001–8,000 feet: 14 PSI
Weighted-Gauge Pressure Canner
For pints or quarts:
- 0–1,000 feet: 10 PSI
- Above 1,000 feet: 15 PSI (CncaD)
Always know your elevation before processing.
Altitude affects the pressure required for safe canning.
Vent the Canner First
Follow your pressure canner manufacturer’s instructions for the amount of water to place inside the canner.
Set the filled jars upright on the rack.
Lock the lid.
Heat the canner with the vent open until a strong, steady stream of steam escapes.
Allow the steam to vent continuously for 10 minutes before closing the vent or adding the pressure regulator. (CncaD)
Then allow the pressure to rise to the required level.
Start the processing timer only after the correct pressure has been reached.
Keep the Pressure Steady
Maintain the correct pressure throughout the entire processing period.
For example, if you are processing quart jars, the potatoes need the full 40 minutes at the required pressure.
If pressure drops below the required level, bring the canner back to the correct pressure and restart the processing time.
This is one of those moments when trying to save five minutes can create considerably more work.
Slow and steady wins the pantry shelf.
Let the Canner Cool Naturally
When the processing time is complete, turn off the heat.
Allow the pressure canner to depressurize naturally.
Do not:
- Pour cold water over it
- Force the vent open
- Remove the regulator prematurely
- Try to speed up cooling
The heating and cooling phases are part of the overall processing conditions used for pressure-canned foods. (CncaD)
Once the pressure has completely returned to zero, follow your canner manufacturer’s instructions before opening the lid.
Open it away from your face because the steam will still be very hot.
Cooling the Jars
Lift the jars straight up with a jar lifter.
Place them on a towel or cooling rack.
Leave some space between jars.
Do not tighten the bands.
Do not push down on the lids.
Do not keep moving them around to check whether they have sealed.
Let the jars cool undisturbed for approximately 12–24 hours.
Then check the seals.
What the Potatoes May Look Like
Do not worry if the liquid becomes slightly cloudy.
Potatoes naturally release some starch.
Using fresh boiling water rather than the cooking water helps reduce excessive starchiness, but the jars may not look crystal clear.
You may also notice the potatoes settle after processing.
As long as you followed a tested method and the jars sealed correctly, small appearance changes are normal.
How to Store Them
After the jars have cooled and you have confirmed the seals, remove the screw bands.
Wipe the jars clean.
Label each jar with the contents and date.
Store them somewhere:
- Cool
- Dry
- Dark
- Away from direct sunlight
- Away from ovens and other heat sources
Do not store sealed jars somewhere that regularly becomes very hot.
Before using any home-canned food, inspect the jar carefully.
Easy Fried Potatoes
This is probably the first recipe to make once you open a jar.
Ingredients
- 1 quart canned potatoes, drained
- 1 tablespoon olive oil or butter
- ½ small onion, chopped
- ½ teaspoon paprika
- ¼ teaspoon garlic powder
- Salt and black pepper
- Chopped parsley
Instructions
Drain the potatoes very well.
Pat them gently with paper towels.
Heat the oil in a skillet over medium-high heat.
Add the potatoes.
Let them cook without constantly stirring so the bottoms can brown.
Add the onion.
Season with paprika, garlic powder, salt, and pepper.
Continue cooking until the potatoes have golden edges.
Finish with parsley.
Serve with eggs for breakfast or alongside chicken for dinner.
Quick Creamy Mashed Potatoes
Canned potatoes also make ridiculously fast mashed potatoes.
Ingredients
- 1 quart canned potatoes, drained
- 2 tablespoons butter
- ¼ cup warm milk
- Salt
- Black pepper
- Garlic powder, optional
Instructions
Place the drained potatoes in a saucepan.
Heat gently until hot.
Add the butter.
Mash thoroughly.
Gradually add the warm milk until the texture is creamy.
Season to taste.
You can have mashed potatoes on the table before everyone has finished asking what is for dinner.
Potato Soup Shortcut
A jar of canned potatoes eliminates one of the longest parts of homemade potato soup.
Sauté chopped onion and celery in butter.
Add broth.
Stir in drained canned potatoes.
Season with black pepper, garlic, and thyme.
Simmer for about 10 minutes.
Mash a few potatoes directly in the pot to naturally thicken the soup.
Add milk or cream at the end if desired.
Dinner is done.
Can You Add Onion or Garlic to the Jars?
For pantry canning, don’t casually add extra vegetables or change ingredient proportions unless the additions are included in a tested recipe.
Onion, garlic, peppers, meat, dairy, flour, and other ingredients can change how heat penetrates the food.
It is much easier to can plain potatoes and add whatever seasonings you want after opening the jar.
That also makes each jar more versatile.
One batch can become breakfast potatoes, another can become spicy curry, and another can become creamy soup.
Can You Raw-Pack Potatoes?
For the tested white-potato method described here, use the hot-pack procedure.
The potatoes are briefly cooked before going into the jars. (CncaD)
Although raw-packing may appear in older family instructions or social-media posts, following a current tested method is the better choice for pantry storage.
Can You Leave the Skins On?
For this tested method, peel the potatoes.
Even if potatoes with their skins look beautifully rustic in a jar, the established procedure specifies washing and peeling before processing. (CncaD)
Save skin-on potatoes for fresh cooking.
Can You Use an Electric Pressure Cooker?
A small electric pressure cooker or multi-cooker is not automatically equivalent to a pressure canner.
USDA processing recommendations for low-acid foods are based on pressure canners with specific heating and cooling characteristics, and the National Center for Home Food Preservation does not recommend applying those pressure-canning schedules to small pressure cookers. (CncaD)
For shelf-stable potatoes, use an appropriate pressure canner.
Frequently Asked Questions
How long do pint jars process?
Process pint jars of hot-packed white potatoes for 35 minutes at the appropriate pressure for your altitude. (CncaD)
How long do quart jars process?
Quart jars process for 40 minutes. (CncaD)
Do potatoes need salt?
No.
Salt is optional and is added for flavor rather than preservation.
Can I use the potato cooking water?
Use fresh boiling water instead.
The cooking water contains excess starch and is not part of the tested method. (CncaD)
Why are my jars cloudy?
Some starch may naturally escape from the potatoes during processing.
Using properly prepared potatoes and fresh boiling water helps reduce excessive cloudiness.
Can I water-bath can potatoes?
No.
Potatoes are low-acid vegetables and require pressure canning for shelf-stable preservation. (CncaD)
Do I need to cook the potatoes again after opening?
They are already cooked, but heating them before serving gives the best flavor and texture.
Final Thoughts
Home-canned potatoes are not glamorous, but that is part of their charm.
They’re inexpensive, practical, filling, and ready whenever you need a fast side dish or the beginning of an easy meal.
Prepare the potatoes properly, peel them, briefly par-cook them, pack them with fresh boiling water, leave the correct headspace, and pressure-can them using the appropriate time and pressure for your jar size and altitude.
Then months later, when dinner needs to happen quickly, that humble jar on the pantry shelf starts looking very clever indeed.